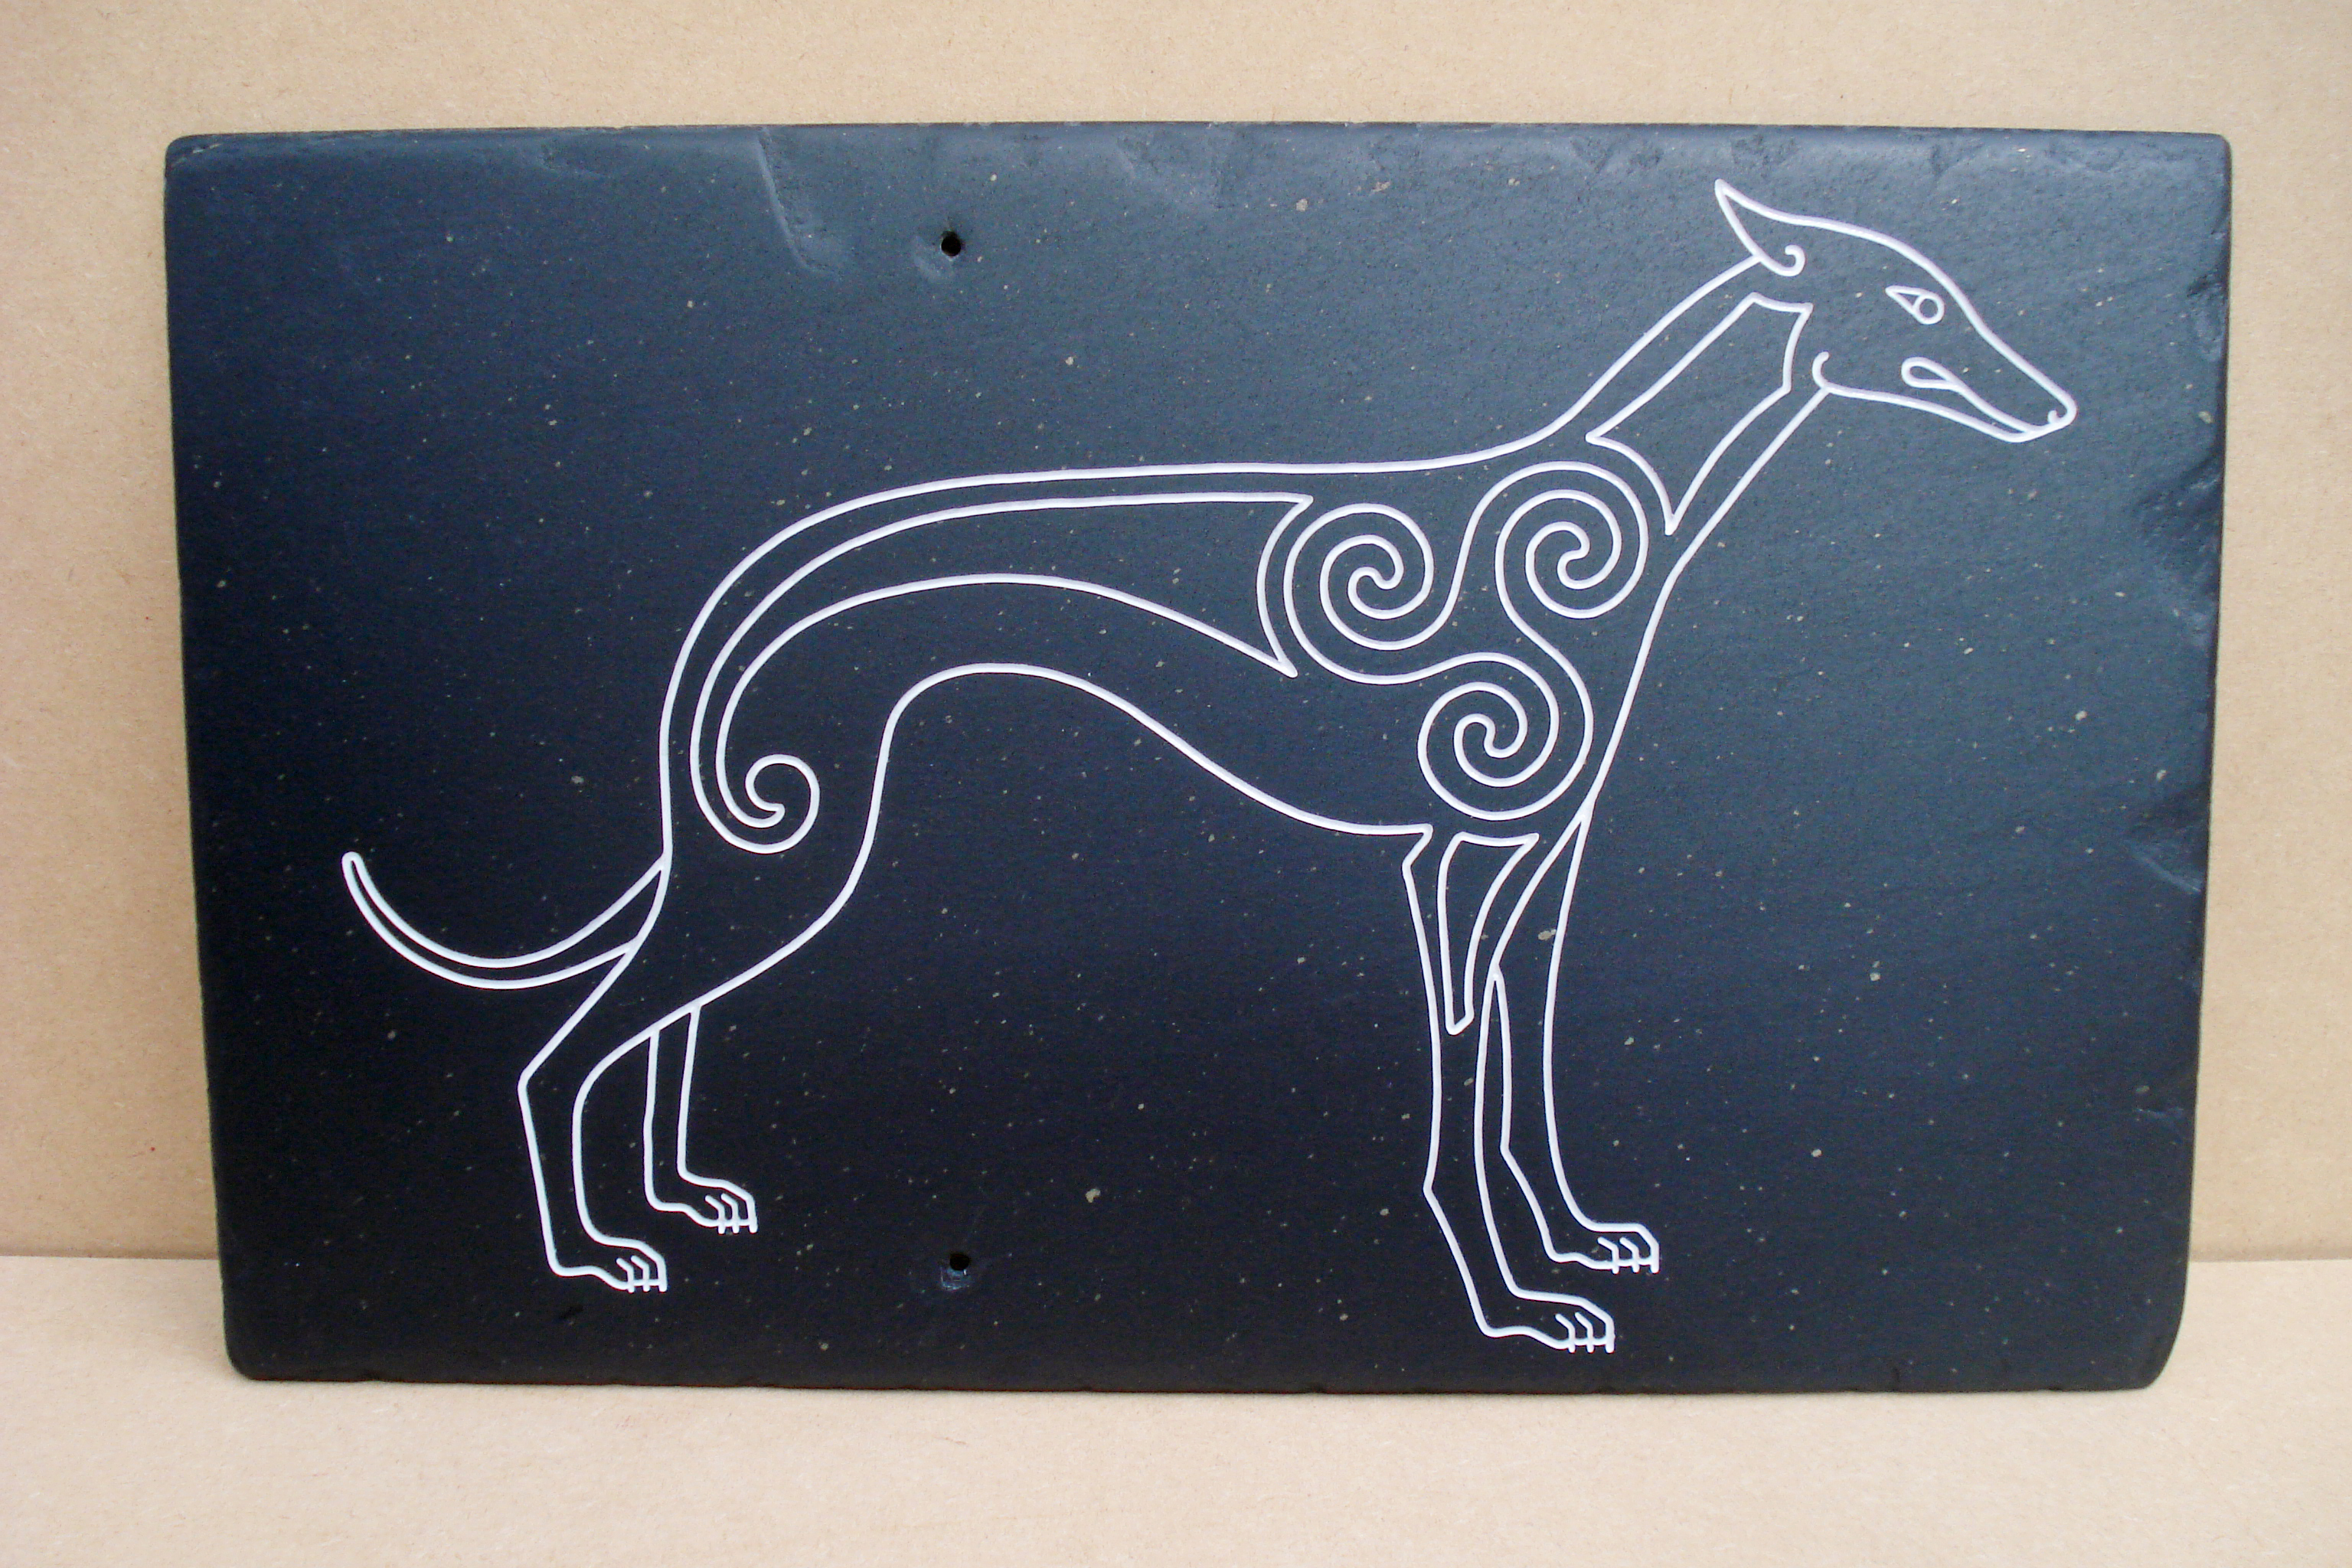
A commission request landed in my Facebook inbox to make one of my Pictish/Celtic hound plaques for someone with an interest in Irish megaliths. To create the internal design of the hound, I immediately thought of the carved kerbstones around Newgrange passage tomb (located in the Boyne Valley, County Meath).
I used the carvings from one of the most recognisable kerbstones as my source material- this is Kerbstone K1 (also known as ‘The Entrance Stone’);
The main spirals and diamonds, with their echoing wave lines, allowed me plenty of scope for creation within the hound outline. My finished design (strictly copyright HatchBurnCarve) was carved into a large reclaimed roof slate (40 x 25 cm) and was filled with 1-Shot professional monument/signwriters enamel. After the enamel had fully cured, the slate was hand polished to a mirror-like finish.
I could probably spend a large amount of my time making rune stones just to keep up with demand and requests. It’s amazing to think that the sets I’ve made in my small Scottish workshop have found their way all over the world- from America to Australia, Europe and beyond…
I started making rune sets almost 10 years ago using stones collected from various streams in Cornwall and the south of England, then moved to a more local source- the Leithen Water that flows through the town of Innerleithen in the Scottish Borders. The more that I’ve learnt, read and worked with the runes, the more I’ve come to realise that they represent something over and above an alphabetical system (or a divinatory tool). Each rune is the magickal symbolic distillation of an aspect of nature- the Germanic root of the word (‘run’ or ‘runa’) translates as ‘whisper’ and it’s this word which sits most comfortably with me when I think of the runes.
There are thousands of Elder Futhark rune sets on the market, a large percentage of which are mass produced, or made from non-natural materials. At first, I was just making runes from stones we found on our travels as this seemed the most obvious, and familiar, choice of material. However, I now understand that the first choice of stone as a rune material was the most appropriate one. Personally, the more removed the runes are from nature, the less we can connect with the magickal symbolism of each. It’s why I offer my runes in an unsealed state- once they are in the hands of their owner, they can work with them, get a feel for them and know them before choosing to seal (or not).
I find the concept of liminality a fascinating one- the places and times between the conscious and subconscious, between the seen and unseen. In the past few years, we began to collect stones from a specific place at a specific time. The place is the confluence of the Leithen Water and the River Tweed (which has it’s own liminal quality as it forms part of the border between Scotland and England). The time consists of the cold, dark days between Yule and Hogmanay- the end of the year when time seems to have a more fluid quality. Yuletide in Scotland is rich in superstition and folklore, and mixing in the Norse origins, was traditionally a time for ghosts, guising and divination.
The composite featured image above includes a photograph taken on the 28th December 2021 at the place where the stones are found.
Once we’ve collected stones, I separate them into groups roughly based on size and/or shape. I individually hand carve each rune selecting a stone from a group. Once grouped, I intuitively draw the runes- usually each stone I hold will feel ‘right’ for a specific rune. They are then carved, washed and placed in cloth bags (which I also make). I’ll leave it to my customers to say what they think;
“These are precisely as runes should be: natural, individual, and made with clear care.”
“Absolutely how you want runes to be. Immaculate craftsmanship & amazing energy to the stones.”
If you follow this link to my Etsy shop, you’ll find the Elder Futhark rune stone sets I currently have in stock.
Having sold all of my serpentine pendants, I took some time between commissions to make another batch from the pieces of serpentine we found at the Lizard Peninsula in Cornwall a few years ago.
I always make sure that serpentine is kept continually wet when working with it- it’s not only easier to cut and shape, but some serpentine can contain chrysotile (or white asbestos). I should state that pieces made from serpentine pose absolutely no health risk- it’s only during the cutting/grinding stages that respirable powder could be produced. I used to work with serpentine in a small water bath, but it clouded quickly and it was time-consuming having to continually change the water. After some reading, I rigged up a DIY lapidary water-drip system. This is essentially a 5-litre container, a length of aquarium tubing and a laboratory clamp! It works very well, saves a lot of time when making a large batch and the size/rate of drips is easily controlled with the clamp;
As well as making some pendants in a similar shape and style that I have done previously, I wanted to try shaping some to resemble flint arrowheads. For these (and the other pendants), I used a large variety of diamond burrs and attachments with my Foredom H44T handpieces- circular saws, corers, ball burrs, cylinder burrs and flame burrs.
For the arrowheads, the barbs and tang were cut with the diamond circular saw and the ‘notches’ (to imitate the knapped edges) were initially marked with a cylinder burr, then taken to depth with needle files. Once the edges were shaped, I used different grades of wet and dry paper to smooth them out (400, 600 and 1200). The final stage before tumbling was to smooth over the whole surface of each with three grades of 3M Scotch-Brite radial bristle discs under the water-drip system.
All the stones were placed in my stone tumbler and tumbled for either 30 hours (arrowheads) or 40 hours in total (with regular checking and reduction in grit grades). Finally, all stones were buffed with tin oxide paste and burnished in the tumbler for an hour with soap flakes and dishwasher rinse aid.
I assembled these pendants with 2 mm thick black waxed cord and they are each tied with adjustable slip knots. You can see all of my recent serpentine pendants by following this link to my Etsy shop.
Following on from the first batch of brick candle holders I made, I actually remembered to take some images of the process this time around!
I recently made another large batch of these using bricks from the old Caerlee Mill site in Innerleithen as well as others found at various sites across south and east Scotland. The process of turning bricks into tealight holders is a cold, wet, messy and noisy one- for the life of me I’ll never understand why I seem to leave this job until winter!
First stage is to remove any old mortar from the bricks using my mallet, chisels and wire brush;
Following this, I mark the positions of the tealights using a chalk pencil;
The bricks are then soaked in buckets of water for a period of time. I then clamp them in my old workmate and core the holes using my vintage drill and a diamond corer. The drill belonged to my Dad and this Black and Decker D720 is still going strong today (cost a whopping £19.25 back in 1977!);
At this stage I get to close my workshop doors and turn the heater on! I chisel out the cores and brush all surfaces of the bricks to remove any loose material;
It takes around three days to a week for the bricks to fully dry out before applying a coat of masonry stabiliser (another day or so of drying) and rubber-foam pads to the base. Here’s an example of one of the ‘Edinburgh’ brick candle holders;
I have some of these available in my Etsy shop and the wonderful people at The Hub on the High Street (in Innerleithen) are stocking more of these.
After collecting bricks from many sites, I’ve been reading up on their history and their importance in our industrial heritage. My main source of information has been the amazingly comprehensive Scottish Brick History website. One thing I have learnt was that there wasn’t actually an ‘Edinburgh’ brickworks (unless you count Niddrie)- the consensus among brick collectors and enthusiasts is that the Edinburgh bricks were made at the Wallyford Brickworks (East Lothian) that was in operation from 1924 to 1972.
A commission for a set of wooden key fobs for a house in France that I made from pieces of reclaimed oak (10 x 3.5 x 1.5 cm).
I used 0.8 and 1.6 mm tungsten carbide burrs to carve the outlines and letter interiors before sanding and shaping the wood. The letters were painted with metallic copper 1-Shot enamel, areas of ‘over-painting’ sanded and the fobs were finished with beeswax.
I sold ‘Cutting Teeth I’ to a delighted customer in March 2021, so decided to offer this second similar athame for sale.
This athame was also made for an exhibition in the Scottish Borders, using local natural found materials. The piece of slate for the blade was found at Altarstone disused slate quarry, near Stobo in Tweeddale. The name of the quarry derives from the ‘Altar Stone’ which is found next to the road just before the track to the quarry. This area is linked to the wizard Merlin- the marks on the top surface of the Altar Stone were allegedly made by a witch who was being pursued by Merlin. In the chase, she transformed into a hare and clawed the solid rock as she fled. The site of Merlin’s grave can be found in the nearby village of Drumelzier.
I found the sheep jawbone on the slopes of Lee Pen, near Innerleithen, and made the pitch-pine resin from materials I found in the local forests around here.
This piece measures around 30. 5 cm long, 5.5 cm wide, 1.5 cm thick and weighs 240 grams. If you would like to own this athame, please get in touch using the contact form in the ‘About Me/Ordering Items’ page, or email hatchburncarve@yahoo.co.uk
As well as making the ‘Vinum Cibus Vitae’ plaque for The Lunesdale Arms in Lancashire, the owners also commissioned me to make a Pictish boar plaque to adorn the walls of the restuarant.
This was made using a large reclaimed roof tile (40 x 25 cm) complete with the original nail holes. The boar was freehand carved with 2.1 mm diamond ball burrs and enamelled with two coats of metallic gold 1-Shot (a professional enamel used by signwriters and makers of stone memorials).
As I’m one to hardly ever say ‘no’ when I am offered stone, I have amassed quite a stock of different materials. Included in this is some lovely old pieces of Italian marble. With the smaller off-cuts of this stone I decided to try making marble pendants.
I crafted these by hand, firstly coring the hole for the cord, then shaping. Starting with a tile saw, I roughly cut the desired shapes, then refined these with my needle files. When I was pleased with the shape, I began the slow process of sanding and polishing- from 120 grade down to 1200 wet and dry paper. The two below are available in the ‘Stone Pendants‘ section in my Etsy shop.
As well as collecting reclaimed materials, I’m sometimes lucky enough to find hag stones (or adder/witches stones) when we are on our travels around the country. These rare naturally-holed stones have always been held in high regard for anyone interested in folklore or magick. It is believed that these stones can offer magickal protection and can be used to see into the realm of the faerie and other hidden lands. I have kept a few of these and they are hanging above the entrance to my workshop. I make pendants using some of the other hag stones and offer them for sale over in my Etsy shop.
I was commissioned to make one of my Pictish/Celtic hound plaques with the brief that the dog should be sleek and slim (like an Italian greyhound) had to include a triskele within the design.
Below is the finished piece (design strictly copyright HatchBurnCarve) – this was carved from a large reclaimed roof slate (40 x 25 cm), the carving enamelled using white 1-Shot and finally hand sanded and polished to give a high-sheen surface.
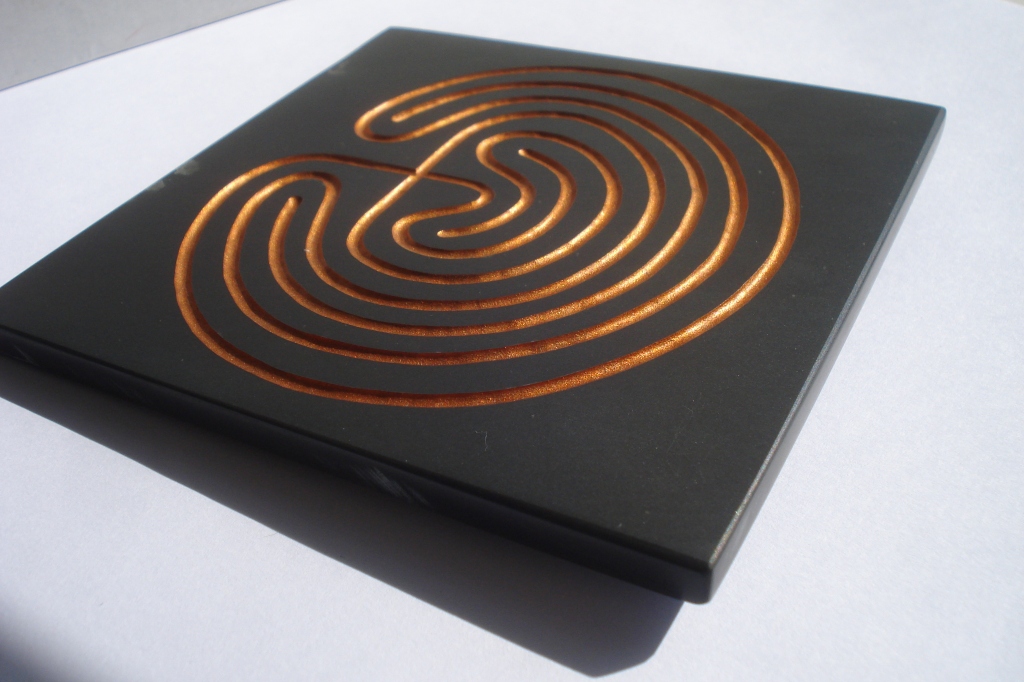
These labyrinth plaques are based on the carving found at Rocky Valley in Cornwall. After many many years of longing to visit Cornwall, I finally visited the site in July 2013;
To make my labyrinth plaques, I start with piles of thick reclaimed roof slates, cutting 10 cm blank squares with my wet stone saw. Once these have dried, I smooth the surface with an angle grinder and sander. The labyrinth design is transferred to the slate and carved using 2.1 mm diamond burrs. After carving and washing, I apply two coats of monument/memorial enamel, leave this to cure for a number of days, then hand-polish the slate surface down to 1200 grade.
As these are very popular with my customers, I try to keep a stock for sale- just follow this link to my Etsy shop.
I often make these as commissions in various sizes, such as this one below that I made for a customer in Germany;